This section of the website is to compile useful reference material that I've created, but that doesn't necessarily fit into an easily definable category. A lot of the information comes from forum posts and other scattered sources, so it will necessarily be less organized than the rest of the site.
Furnace Performance Calculator (downloadable Excel spreadsheet)
This calculator is used to calculate the melt times for a hypothetical furnace with given properties. It is, of course, not guaranteed to be accurate, but it should provide a close approximation for most situations. It provides a fairly accurate model of how the furnace efficiency changes with melt temperature, instead of assuming a constant efficiency. The model may break down and cease to be accurate in conditions very near the upper temperature limit of the furnace in question, but it is at least capable of approximating where this limit is.
Forum Posts
On the use of Portland cement in refractories:
Portland cement, when broken down into oxides, is roughly 66% (by mass) CaO, 23% SiO2, 6% Al2O3, and 5% Fe2O3. This can vary quite a bit, depending on the type of cement, but to simplify calculations, let's ignore the small stuff and assume it's 66% CaO and 34% SiO2 in ceramics calculations. This will get us close. The powdered form is essentially the anhydride, so we don't have to compensate for water weight when measuring out the formulation.
CaO is a moderate-expansion flux, so large amounts of it in a ceramic recipe won't contribute to poor thermal shock properties like Na2O would, but it's still poorer than fluxes like MgO and B2O3. (CLE, or Coefficient of Linear Expansion, is 0.148 for CaO. Compare that to 0.026 for MgO, 0.063 for Al2O3, or 0.387 for Na2O.)
CaO starts fluxing about 2000 F, is moderately active at 2200 F, and is very active at 2350 F.
Let's take a recipe that's equal parts ball clay, Portland cement, and silica sand. This breaks down to about 65% SiO2, 22% CaO, and 8% Al2O3, with about 5% LOI from the powdered ingredients (much more once the cement becomes hydrated). The CaO-SiO2-Al2O3 phase diagram says that melts at about 2450 F, and has a slushy component at 2200 F. This refractory will fail at high temperatures, as observed by people that make their furnaces from Portland cement.
Now let's add 10% Portland cement to a kaolin/kyanite/alumina mix, adjusting the alumina to make somewhat-fluxed mullite and the kyanite so that the mix has net-zero-shrink properties at 2800 F. I'm not going to bother calculating the recipe exactly, but the oxide components will work out to about 7% CaO, 52% SiO2, and 41% Al2O3. This melts at 2900 F, not too far shy of the unadulterated mullite's melting temperature of 3200 F. Better yet, it has no significant slushy phase after it's been fired, since it's rather close to the eutectic, but it will fire strongly and hold together at temperatures as low as 2400 F without long soak times due to the flux creating a liquid phase.
This looks sort of like a commercial castable in behavior so far, but let's look at its other properties.
Adding that 7% CaO has raised the CLE about 13%--not a debilitating change, but it's there.
Drying shrinkage has been reduced significantly, since the Portland doesn't shrink, and tends to create a matrix that prevents the clay from shrinking either. To figure out how much, you would have to test. There's probably still enough drying shrinkage to crack if dried too fast.
Porosity has been reduced by the Portland, and since it cures slowly as the clay loses water, the sample will take a very long time to dry. I'd estimate at least a 30-day cure time before firing. Adding porous grog may reduce this amount.
The Portland hydrates even more than clay does, so firing shrinkage is going to go up about 30% from what it was before. I'd estimate roughly that firing shrinkage will go from 8% to 11%, making reasonable assumptions about the clay. Adding more kyanite can counteract this, but counteracting too much (especially with coarse ingredients) could create lots of internal stress. Plus, you eventually run out of room in the recipe.
How will it behave with that Portland in there? Probably like clay for the first ten hours or so, then it should slowly become harder and more difficult to work. With only 10% Portland, it may never lose workability completely, but will probably be very difficult to do much more than minor repair after a couple days. That means the recipe now has a working time, as opposed to clay's essentially limitless working time. It will definitely be plastic instead of castable, and I doubt you could properly deflocculate a casting slip with all that alkaline Portland in it.
So, to conclude: A recipe with a small amount of Portland could definitely be usable, but experimentation is needed to figure out what the trade-offs are. Recipes with amounts large enough to act like concrete instead of clay with regards to working properties are also not going to handle high temperatures.
. . . . .
That experimental mix [Ed note: 45% silica sand, 45% kaolin, 10% Portland] is 69% silica, 18% alumina, 7% calcia, and 6% LOI (of the clay, I'm too lazy to calculate hydration for the Portland).
That makes it melt at a temperature of 2600 F, a bit low but not intolerable for nonferrous work. Silica is much more susceptible to fluxing than alumina--note the 300 F difference between your recipe and an alumina-rich mullite with the same amount of flux.
If you actually fire near 2600 F (and hold it there long enough to dissolve what I'm guessing are very coarse pieces of silica, at least in relation to other ceramic ingredients), the silica and flux will mostly be in the amorphous state, but if you don't get that silica dissolved, it will have a rather high rate of thermal expansion.
On separating metal alloys:
Flux is one thing. Borax works well as a flux, and so does soda ash (my guess as to what the "ash" was--a mix of soda ash and borax would make a good flux for precious metals).
I know of no way to separate metals in an alloy simply by melting and fluxing, however.
There are a couple ways to "clean" a metal. For something like gold, most things are more reactive (copper, silver, lead, zinc), so you can drop something reactive in to oxidize nearly everything but the gold, in which case it ends up as mixed oxides in the flux layer. Oxidizing silver is slightly tricky, since its oxide isn't stable at those temperatures (neither is gold's or anything less reactive), but you can get rid of copper and everything more reactive by dropping in a noble metal oxide (expensive), bubbling oxygen gas through the melt, or adding a chemical that decomposes to release oxygen, producing a flux or something else that gets skimmed off (instead of a noble metal that ends up alloyed with your gold). To get rid of silver, you'd have to use a different reaction (sulfide?) or a different chemical means of removing it.
Things more noble than gold (platinum, palladium) aren't going to be removed so easily. You can react the gold with something, leaving the nobler metal as is, but gold doesn't react with much, and in the molten state, a lot of what it does react with will decompose immediately.
That brings us to another method, which uses a chemical solvent instead of carrying out the reaction with molten metal. A common one is aqua regia, but there are others (halogen gases, cyanide, etc.) This method occurs at or near room temperature, but prefers a finely divided source instead of lumps of metal. Anyway, in this process, the impure source is dissolved. Metals can then be precipitated from solution in reverse order of reactivity: platinum and palladium (if they dissolved in the first place: I think they do, slowly, in hot AR), then gold, silver, maybe even copper, and whatever's left, along with the dissolved metal you use to drop the others out of solution, stays in the used acid and is discarded or possibly recycled.
This will produce finely divided metal particles that are filtered out of solution at the appropriate times, then melted down with flux to produce lumps or ingots.
The third method, fractional distillation by boiling point, is only practical for metals like zinc that have reasonable boiling points. Other stuff will require very high temperatures and complex apparatus to collect the product. (Zinc is cheap enough that you can let it boil, burn, and exhaust to the atmosphere instead of trying to collect it. Magnesium is another one that can be removed with this method, but liquid-state oxidation will probably be easier.)
Now, fluxes will remove metal oxides from gold. Panned gold is likely to be reasonably pure (possibly some silver or copper in the alloy), but mixed in with bits of rock and sand (metal oxides), and ordinary fluxing will have no trouble removing that. I'm guessing that's what you saw.
On slip casting:
My instrumentation for analyzing casting slips consists of a postage scale (a scale with 1 gram accuracy at least is necessary for anything ceramic, 0.1g accuracy is much better), a package of disposable plastic cups, and a stick. You can use your finger instead of the stick if you don't stick it in the mixing blades, but a stick is kind of nice to persuade lumps of solids into the blades. You don't want to use your fingers for that.
Procedure: To measure specific gravity, I weigh an empty cup, a cup filled with water to a given line, and then the cup filled with slip to the same line. A bit of math gives specific gravity accurate at least to three significant digits, which is plenty accurate enough. (If you're doing mullite, there's so much heavy alumina in the recipe that the slip will probably be about a tenth of a g/cc higher than recommended for normal slips for the same slurry properties.)
Viscosity is more subjective. There are two tests. Test number one: Dip the stick in the slurry and watch it drain. You're mostly looking at the width of the stream of slip, but you can also tell if it's right by the amount of slip the stick picked up out of the batch.
Test number two: Look at the level of slip in the container, the speed setting of the mixer, and the depth of the whirlpool. Also, toss some fine dried slip into the pool (it will build up on the outside of the molds, the edges of the bucket, and the floor in the general vicinity of the workplace--don't add anything that's been contaminated) and watch how quickly the particles spiral in. If the edges are stagnant, it's gelling and needs to be corrected. Ideally, the whole batch should be in more or less uniform motion.
These tests are subjective and take more than a little trial and error, but I think that until you do some trial and error, you wouldn't necessarily know what to do with the measurements if you had them. Numbers are just a guideline: more important is how the slip actually behaves. (You can cast successfully with a fairly wide range of viscosity and specific gravity, but you cannot cast at all if the slip gels or settles out in the mold. The state of controlled flocculation that you need is a complex balancing act between pretty much every parameter you have control over. Measuring one or two of those doesn't tell you the whole story.)
Yes, you do need to mix it for hours. No, you don't need a fancy mixer to do it. I used a small induction motor from a bread maker, a router control (not ideal for use with induction motors, because it creates an unstable equilibrium where any reduction in viscosity will allow speed to rev up; if the new speed sucks air into the mix, viscosity is reduced further and speed is increased until the motor is essentially at full throttle, which aerates the slip and makes a mess), a piece of rod, and a piece of flat stock as the mixing blade.
Any addition of reclaimed scrap or powdered mix will take a couple hours to mix to equilibrium. Water or deflocculant might take twenty minutes. The slip will eventually gel on standing, and will require a couple hours to get mixed back up. Thus, if you're using it in a semi-production situation, it's best to mix 24/7, or at least all day.
On machining cast aluminum:
Aluminum as-cast has a different temper from extruded aluminum scrap, thus it will machine differently. (It is possible to anneal and re-temper; I haven't really experimented with tempering.) The alloy can also change (e.g. picking up iron from the crucible, which tends to make it more brittle). On top of that, you could have gas, slag inclusions, or sand inclusions. If you see a dark spot on the casting, look at it closely. If it's a hole, it's gas. (If the holes are evenly distributed, it's dissolved gas; if it's in an area that would trap mold gas, it's probably mold gas.) If it's dark gray stuff, it's slag, either from not fluxing/skimming properly or created from poor mold filling (allowing aluminum to pour onto itself, exposing parts of what should be the inside of the casting to the atmosphere). Always fill from the bottom up. If it looks like a grain of sand, it's a grain of sand. Check the moisture and clay content of your sand, make sure you clean out the molds better, put a trap in your ingate, and fill with low turbulence.
When machining, there's a lot you can do to improve finish. (If you can't get a good finish on a piece of bar stock, the problem is your machining, not your casting. If you can get a good finish, your machining is likely to be fine.)
Feeds and speeds can be calculated, or if you do enough work, you'll get a feel for them. In general, increase speed and decrease feed and depth of cut on a finishing cut, but not so much that you produce squawk. Also, keep your tools sharp.
For lathe work, make sure the rake angles are correct for the material you're cutting (any introduction to lathe work will have a summary of rake angle), and use a finishing tool with a wide radius. Also make sure the cutting edge is at the right height. Make sure the work is supported--in general, the maximum unsupported span should be three times the diameter. You can get away with more, but it's good practice not to, especially if you're having trouble. For long thin pieces, that means a steady rest or follow rest.
For mill work, make sure you're using the correct cutter and that the mill is trammed correctly. For blind cuts, that's a two-flute end mill; for facing-type operations, it's a four-flute. Rigidity of the machine can play a big part too (really, in both cases, but this one is maybe more noticeable)--my import drill/mill makes a surface maybe an order of magnitude rougher than, say, a good-condition Bridgeport. The reason is that the head is on that round column and it's not rigid. Make sure the work is securely clamped down.
On a lathe, you can "clean up" a finish (which had better be pretty good already) by cranking the speed up to 1000-2000 RPM (don't exceed the centrifugal limits of the chuck or the workpiece!) and attacking it with around 600 grit sandpaper. After that, you can polish it in the lathe with polishing compound and a bit of cloth, or take it out and buff it. Be very careful that nothing can wrap around the workpiece and drag you in (a large piece of cloth is a bad idea--just enough to keep you from burning yourself is better), and that your fingers don't get too near the spinning chuck jaws.
An air-powered ramming tool
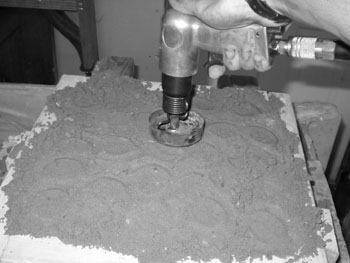
Best picture I have.
This is a $5.00 air chisel (with chisels) from Harbor Freight, the bottom of an empty propane tank, and a bit of brazing rod. Before that, I had a chunk of turned PVC round stock epoxied on to the cut-off end of one of the chisels, but the epoxy joint didn't last long.
Despite the short stroke length, it does a very good job of ramming. It takes a bit of practice not to ram too hard (a couple of strokes at each location is plenty; bearing down on the trigger is enough to make lumps of sandstone), and to ram evenly, but it's not that hard to do. The tool does use a considerable amount of air, but my medium-sized compressor (about 5 CFM at 90 PSI, I think) can keep up with it okay, especially since it's not going to be running continuously. (When using the same air chisel to do some surgery on a concrete porch, for which it was pretty much in use constantly, the compressor stayed on enough to eventually trip a thermal overload.)
The chisel itself, being a cheap import, is machined to low tolerances but fairly solidly built: there's not really anything that can break other than the spring that holds tools in. It uses oil for its sealing, to the degree that it will not operate at all if it runs dry. Mine quit working one day, so I disassembled it to discover that there was absolutely nothing wrong with the mechanism (and really, not a whole lot that could conceivably go wrong), and a tablespoon of oil applied to the piston surfaces put it right back in working order. If I'd been lubricating regularly through the air input (oops), I wouldn't have had to take it apart.
With it, I can ram both sides of a 12x12 mold in about 5 minutes for the actual ramming part. There's another 5 or 10 minutes fussing around with the mold cavity, pulling the pattern, rolling the flask, etc., and probably 10-15 minutes babysitting the muller through two or three batches (though, if I ever finish fixing my muller, it ought to be able to handle this much sand by itself in one batch). In total, it probably saves 10-15 minutes per flask compared to hand ramming.
On insulation:
More about insulation than you probably want to know:
Air is a much better insulator than ordinary ceramic materials, but on its own, it forms convection currents that carry lots of heat away quickly. The solution is to contain the air in little pockets in refractory, keeping it from forming convection currents. The more air in these pockets and the less refractory material, the better the insulation--up to a point. In an ideal refractory, that point would never be reached, but refractories are porous, so that air can still move a bit. Kaowool is very porous, so the less dense it is, the less it does to stop convection, but also the less of the more conductive refractory material (fused blown kaolin, if you wanted to know) there is. Therefore, there's some ideal density where insulative properties are maximized relative to thickness. I've heard that quoted around 12 lbs/cf, but I haven't verified that.
Kaowool is expensive, though, and the cost is per mass of refractory material, not per the volume it ends up filling. Therefore, there's also some ideal density where insulative properties are maximized relative to cost. This should be very close to the 8 lbs/cf that common grades of kaowool are sold at (depending, of course, on intended use and a host of other variables that don't really matter).
In other words: Compressing or expanding it a little bit won't hurt anything, but you'll get the most out of it if it's fit snugly into place without compression. Significant air gaps between the wool and hotface are a big no--that's where convection currents form, and you can pull the wool apart slightly to make it fill a larger space, but again, you're straying from ideal density when you do that, as well as potentially making it inconsistent.
Places that don't need a hotface under normal usage (the ring of exposed wool around the top of the hotface and the bottom of the lid, to name a few) can be painted with clay slip or castable fines mixed to the consistency of heavy cream. This will save materials and some heat-up time. (Also, the wool is flexible, and will seal better than rigid refractory unless you're exceptionally careful to make the mating surfaces flat and smooth.) The resulting layer has a leathery consistency, and it can be damaged by poking, exposing the wool, so be wary of it. If you're really paranoid, you can also coat the back face of the wool with the clay or castable slip, or sodium silicate (cheaper, but a flux, so don't get it where it'll get really hot), but since exhaust gases don't go there, you're really not protecting against much.
Considerations for large furnaces
Keeping safety in mind is a very good start, but once you get big enough, there's no way to safely pull the melt without mechanical assistance. Also, dangers like radiant heat from the crucible catching your clothes on fire aren't nearly as apparent as the obvious danger of dumping molten metal everywhere. Even with a mere 5 pounds of iron, the radiant heat is intense enough to scorch a leather welding glove from a foot away during the course of a pour, and make the hand inside more than comfortably toasty. (Guess how I know that . . . )
What dimensions are you thinking of for the furnace, and what size crucible are you planning to use? The best method of designing a furnace is to choose a crucible capable of holding enough metal to pour your biggest planned castings (as long as you're capable of handling it with the investment in gear you're willing to put in), size the furnace to fit that, and then work out the burner size to heat the furnace. A lot of people like to build a furnace first, then try to find crucibles to fit it.
. . . . .
Also, making the molds is a big problem. When I do a casting session with my big furnace, it usually takes about an hour to set the furnace up and an hour to cast--and four to eight hours making the molds. Consider also that rolling over a 300-lb mold, even with mechanical help, is extremely difficult by yourself. A general rule of thumb is that a pound of aluminum will take 10 to 15 pounds of greensand to cast into something useful. I have around 600 pounds of greensand, and I've put a good 500 pounds of that into molds at the same time, and had metal left over for ingots.
Now, without a lift, it's really up to what you can handle safely. I'm not a big person, so I wouldn't want to handle more than about 20 pounds at once. You don't want to be straining, or have to have the crucible close to the centerline of your body, because either situation is just begging for an accident.
On sintering:
Ceramic theory, at least as far as I understand it, dictates that a material (like unfluxed fireclay) that melts at, say, 1980 K (3100 F), will take an infinitely long time to sinter at 990 K, or around 1320 F. It will take a very long time to sinter at a somewhat higher temperature, and as temperature rises, firing time goes down. I fire unfluxed clays at around cone 18 (30 minutes of soak time at 2800 F), and they fire very hard. Firing to a lower cone, as in my failed kiln firing (say 4 hours of soak at 2200 F for the areas that were most underfired, which equates to about cone 9-10) results in a usable product, but one that's noticeably weaker due to underfiring. A 1600 F firing on any reasonable schedule should end up around cone 010--twenty-eight cones below a full firing, and a rather low temperature even for pottery work. Unless you fired for months on end, used some serious fluxes, or had a much higher temperature, I fail to see how the finished product would hold together at all.
On degassing:
In degassing, there are two methods of gas release. One is mechanical, like shaking a soda, and that's all that bubbling inert gas through it does. (Of course, it does a very good job.) Stirring the melt will do the same sort of thing gas-wise (you may occasionally see little flames of hydrogen at the surface if you do this, especially with a heavy salt flux layer), but if you use a steel crucible or stirring tool, stirring like that is going to put a lot of iron in the melt by breaking up the protective oxides on the crucible and moving lots of aluminum across any defects in the protective layer. It can also mix air with the melt, which makes more dross, and if you have a hydrogen-rich atmosphere (like a rich burner flame), you can even make the problem worse by mixing the hydrogen in and giving it opportunity to dissolve.
The other method is bubbling in an active gas, like chlorine. Chlorine combines with the hydrogen to form HCl gas, which escapes along with the extra chlorine. It also combines with magnesium and lithium (if there is any) in the melt, removing them as salts, which may or may not be desirable. It doesn't react with the aluminum--AlCl3 isn't stable at those temps. The problem with this method is that chlorine and HCl gases are both highly dangerous things to breathe, so you don't want to use any more than you absolutely have to, and you don't want to be breathing the fumes when it happens.
Gases can be sourced either from pressurized tanks or from solid compounds that decompose to form the desired gas. The tanks cost a substantial amount of money for the average penniless hobbyist, but they're definitely the way to go for someone that does large volumes of castings or has an income supply from castings. The solid compounds are probably better for occasional use.
The classic solid compound to use is granular sodium or calcium hypochlorite ("pool shock"), which will decompose into chlorine gas. I'm currently looking to see if I can come up with a readily available compound that's easier to store and releases an inert gas (probably CO2) at aluminum temperatures, to mitigate the safety issues. I mentioned zinc carbonate earlier, but it's not as readily available as I thought.
Either way, a degassing instrument made of heavy steel, pre-oxidized like a crucible would be, should have a pretty long life. If sodium hypochlorite is used, make sure that it's cleaned out each time, because it's an oxidant and will make lots of rust. If you're using a bomb-type delivery system with a threaded plug, it will rust the threads together. Also, holes must be very small or it will both do a poor job and eventually fill with aluminum.